Friday, 29 September 2006

Tips 5: Pitching your Tent (Ventilation)

The facts about condensation
Condensation is the exact opposite of evaporation. Air inside an occupied tent is warm and humid – which means it has lots of “evaporated” water molecules zipping around in it. That warmer, moister air rises and hits the tent wall (which is cooler because of conductive cooling), and those water vapor molecules slow down and “stick” to the cooler surface: they “condense” out of the air and onto the tent wall. The same thing can happen between your sleeping pad and the floor of the tent.

Hilleberg tents combat this process with:

  • Vents situated high up to let warm, moist air out.
  • Double wall design with water repellent, breathable inner tent fabric to let vapor pass through, and to keep actual water out.
  • More venting via mesh panels in the inner tent doors.


Ventilation
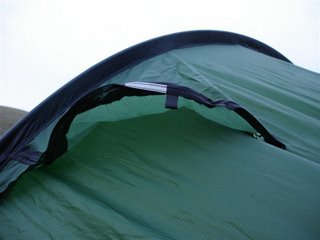
brow vent
One of the vents is an integral part of the entrance of the outer tent. The degree of venting can easily be adjusted by the size of the opening.
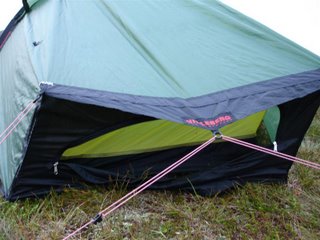
Zipper adjustable vents in head and foot ends of the outer tent provide good air flow, and are protected from rain by the angled design of the end itself.
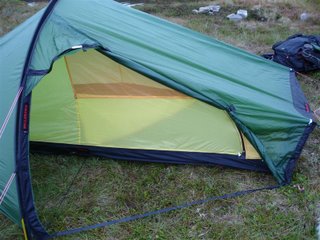
inner
Also the inner tent has a large vent with no-see-um netting at the entrance which should be kept open whenever possible.

[sources: Hilleberg Akto pitching instructions - 2.42mb file >> download pdf version. Hilleberg Tent Manual - 6.09mb file >> download pdf version]

I tend to use all the vents, only closing one of the outer vents (the one that's into the wind) if the wind and rain are strong.

Unless really cold, I'll keep the 'no-see-um' mesh open. It's midge-proof too. In fact, the only place midges go into the inner was where the 2 zips meet, and that was able to be sealed using microporous tape from the first aid kit.

Thursday, 28 September 2006

Tips 4: Pitching your Tent (Guy Lines)

The tent comes with tied-on guy lines which should always be applied, even when the weather is fine.

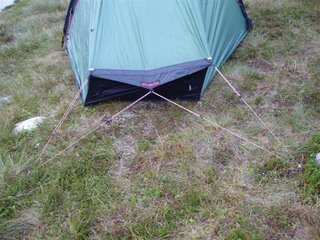
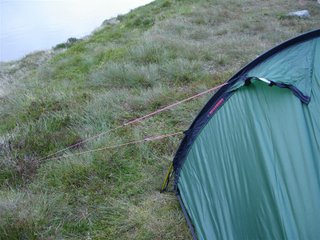
When the ground pegs at the corners are in place one should pull out the guy lines and peg these to the ground. An angle of approximately 45° to the ends of the tent is appropriate.

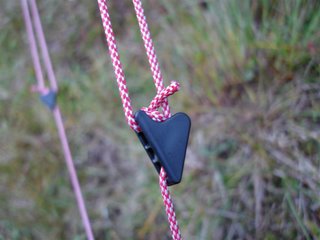
The guy lines have two line runners each and are therefore easy to adjust even when they are immobilized at the pegs or other fasteners. It is imperative to pull the lines as far as possible from the tent for best results in strong wind. They should however not be pulled so tight that they they distort the natural shape of the tent.

In strong and gusty wind one can use another set of guy lines and angle them differently from the tent for more stability in shifting wind directions!

[source: Hilleberg Akto pitching instructions - 2.42mb file >> download pdf version]

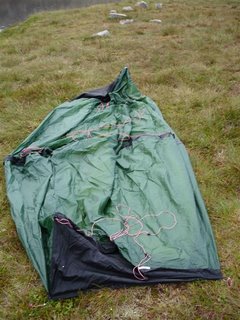
When using the guylines, remember to untangle them from the tent first. It's stating the bleeding obvious, but, unlike many other tents, the guylines are fixed to the fabric in two places, so it's easy for one length to end up caught under the tent.

The guylines are great, and the 'line runners' [see picture below] are a nifty idea, allowing the guys to be located and tightened where the pegs can be secured. Useful in circumstances where the options for pegging are limited.


There are guy lines on the pole sleeve, which I always peg out. Some people don't. I do.

I just don't trust the weather, and the pegging only takes a few extra seconds. Ask yourself, "do you feel lucky?"

Wednesday, 27 September 2006

Tips 3: Pitching your Tent (Inserting Pole)

Insert the pole into the pole sleeve until you feel a slight resistance (about 100 cm / 40 inches into the sleeve).

Then pull the sleeve over the pole until it bottoms at the reinforced end of the sleeve.

Make sure that the pole does not bend before it gets to the reinforced end.

Take the tent by the pole tensioner (f.ex. peg loop) and insert the pole fully into the sleeve so that it bends naturally!

The pole sleeve has only one opening. In strong wind you can kneel on the tent to keep it on the ground.

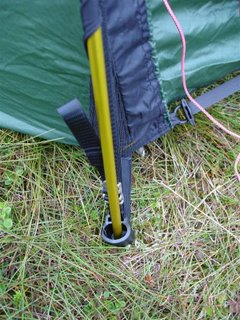
Place the end of the pole into the plastic cup of the pole tensioner.

Pull it taut with the webbing until the pole is right against the side of the tent.

Pole tensioner and pole sleeve allow for double poling, enhancing stability and strength for the most demanding undertakings!

[source: Hilleberg Akto pitching instructions - 2.42mb file >> download pdf version]

Just a couple of things to watch out for here:

1. Make sure that the pole hasn't got caught on the far end of the sleeve.
2. I usually have to release the webbing strap a wee bit more to loosen the pole cup before inserting the pole, then pull it taut.


Tuesday, 26 September 2006

Tips 2: Pitching your Tent (Ground Pegs)

It is good to start by securing one end of the tent against the wind. Make sure that all sections are assembled properly.

Place ground pegs at the corners of the tent (start on the end towards the wind). Pull the tent taut and place the ground pegs at the other end. All four pegs are put through the metal rings at the corners.

Ground pegs are to be placed at an angle of 45° into the ground for good grip.

[source: Hilleberg Akto pitching instructions - 2.42mb file >> download pdf version]


Storing the fabric separate from the poles and pegs saves space in your pack. Also, if you fold/roll the fabric towards the head end in the morning, you can unroll the tent holding on to the 'head' end at night. Makes it easier to place the tent properly for the all-important view.

Making sure that none of the guylines are tangled, peg out the 'head' end with 2 pegs, and then move to the 'foot' end. As you go, untangle any guylines or the central webbing that runs under tent, and then peg out the 'foot' end of the tent. If it's windy or gusting, keep the fabric low and secure as you're moving to complete the pegging out. Relying on 2 pegs to hold down a potential kite is not a sensible option, even if the profile is low at this stage.

For me, the head of the tent is the end with the porch in it. Some people prefer looking diagonally out of the porch. I've slept that way a couple of times when the tent is on a slope and the wind direction has limited the tent's pitching options. You lose the option of having handy gear in the pouch, but that's all.

At the moment I'm storing the tent in the Hilleberg bag, but will be investigating stuff sacks later.

Monday, 25 September 2006

Tips 1: Choice of site

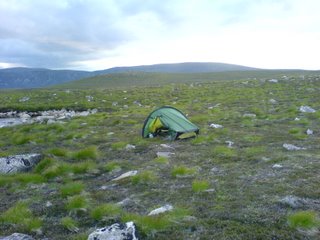
campsite at Lochan Odhar

Choice of site

Find a site that is even and without any sharp objects. Remove those things that can damage your tent. Find a spot that is protected from the wind. Avoid pitching your tent close to any bodies of water to minimize condensation. Avoid also hollows where rain water can gather.
[source: Hilleberg Akto pitching instructions - 2.42mb file >> download pdf version]

One of the advantages with the Akto is that it doesn't need much clear space to pitch it in.

Once I've found an area, eg here at Lochan Odhar to the north of the Braeriach, I drop my rucksack and wander around with my walking poles to find a suitable site. I also want a good view from the door, which is normally over my left shoulder as I'm lying down, with my feet into the wind.

Walking over the ground, I can use the poles to prod the ground, also to measure out approximate areas (2 poles long, 1 pole wide) if there's any doubt. Finally, I can lock the poles together with loops and leave them in the ground to mark where I've decided to camp while I go back and get my rucksack.

All plans have failings, and finding a hidden projection beneath the tent can mean you have to move. I've done that, and it's better than chancing a torn groundsheet. At the moment, I'm not using a 'footprint'. That might change in the future, but I've never used one in my limited time under canvas.

Introduction

Just back from 2 days in the Cairngorm National Park. Once again, the Hilleberg Akto has given me the freedom I didn't have last year.

Yup, I know there's lighter tents, and tarps, out there, but I've never seen a tent designed as well as the Akto. Hence the nom de plume.

Aim of blog: to write down where I've trekked, what I've seen, and just clear my head of the nonsense that I come up with out on the hills.

For example: the Universe won't allow you to climb a Munro unless you can name it. Rubbish, I know, but twice this year I set out for "Beinn Iutharn Mhor, Carn an Righ and the other one". This weekend I set out for Glas Tulaichean first, saying the name at every opportunity. Despite the low cloud and sleeping in (which is another story), I walked to the summit in the poor visibility. And the reason I couldn't get to the summit before? I'd attempted them in Spring, and the summits of all three were still snow-capped.

Background: started hiking again in 2005 after a gap of many years. I'd been car-camping and in the TA for a short time, and watched Ray Mears on TV, so I still had some essential skills and attitudes. However, I don't like scrambling as I know how fragile the human body is. This has put me off attempting some Munros this Summer, so I'll need to get some practice in.

So, that's the introduction done. I've some info to post over the next few days as I get the photos up to Flickr, and gear reviewed. At the moment my Munro count is 31, and I'm aiming for the West Highland Way in October.