Showing posts with label techniques. Show all posts

Friday, 20 June 2008

These are not the words you are looking for

The new edition of Trail magazine came through the letterbox today. Promising tests of ultra-light tents and backpacks, plus wild camping, plus a 9-page 'mission' on going lightweight.

As I'm not allowed to saw anything negative that may affect sales, all I will say is that there was no Akto tested in their test of lightweight tents. Heavier tents are tested. More expensive tents are tested.

As 'mission' - I couldn't get beyond the introduction. The wild camping laws are, again, incomplete. I felt my BP start rising and my leg twinge. Not a good sign. So I put the magazine away.

I feel the urge to thumb through "Lighten Up" by Don Ladigin and Ryan Jordan's "Lightweight Backpacking and Camping", heck, even Chris Townsend's "Backpacker's Handbook". I just can't be bothered with the over-dramatic stance that is taken. Hike your own hike. If you need someone else to tell you how to pick your own nose, you probably shouldn't be trekking out of site of a main road.

Sunday, 25 May 2008

Saturday. To Corrour Bothy

Linn of Dee to Corrour Bothy. Met George and his hiking buddy, Keith. I managed to hear THE football score. Rangers one by one goal, but at one point, Queen of the South scored 2 goals to bring them equal with the Wegies. Unbelievable.

--

IMG_0953s

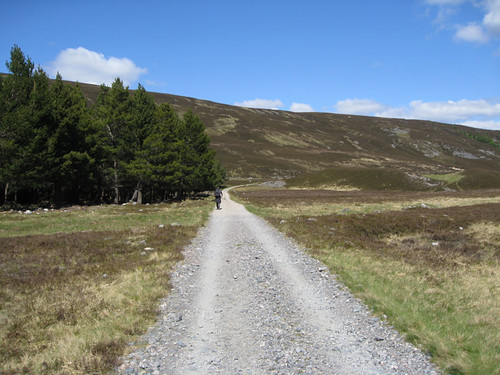
Parked the car at the Linn of Dee at about 2pm, walking along in rolled up fleece sleeves, with sun-tan lotion on, and my boonie hat for eye shade. (maplink)

IMG_0957s

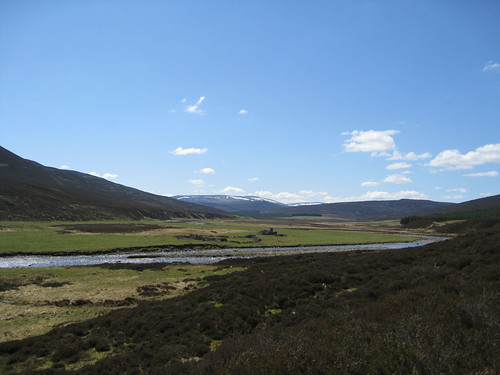
The target is the patch of trees in the distance.

IMG_0963s

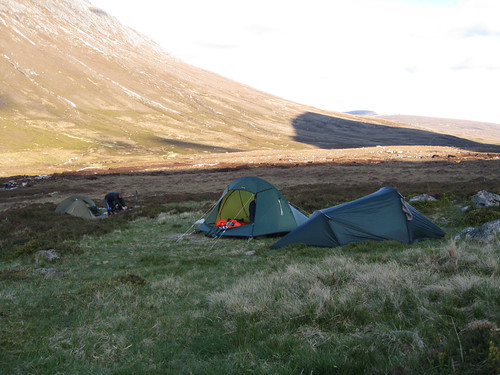
Chewed the fat with Big Kev, who let me know that George and his trail buddy were about half an hour away. Unsurprisingly, in this weather, Kev was in no hurry to leave. he was looking for places where he and his lad could go wild camping. I think he's spoilt for choice.

IMG_0972s

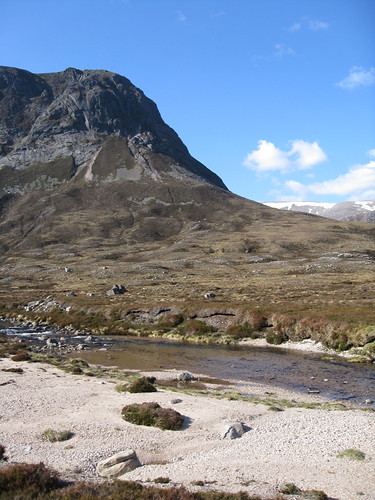
I reached the White Bridge just after 3pm, and turned north up Glen Dee. I stuck to the west side, as I'd never been fully up that side (having walked part of it when walking off Beinn Bhrotain last summer.

IMG_0980s

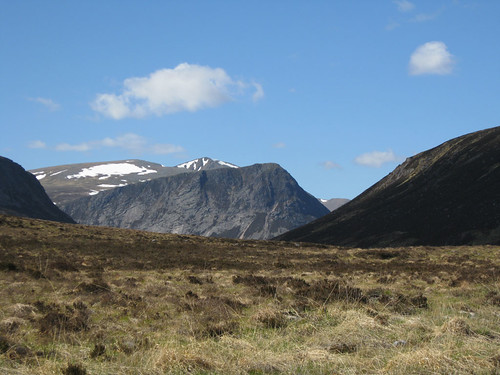
From the west of the glen, the Bod stands guard, blocking the view of the Lairig.

IMG_0988s

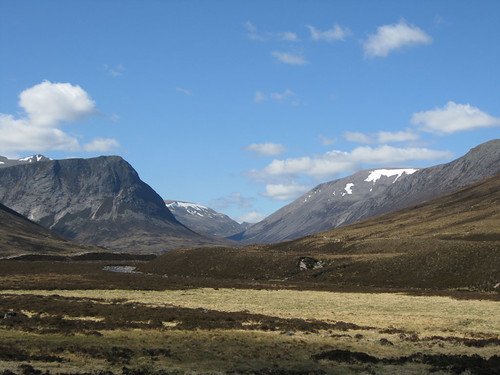
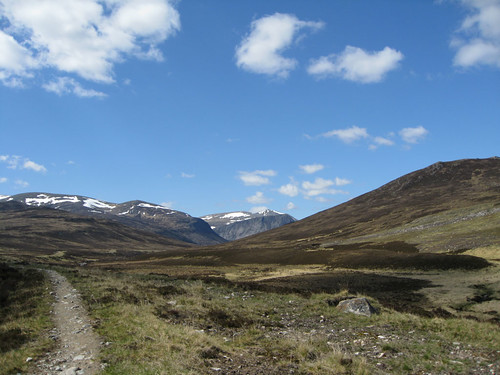
Further up the glen, the Lairig Ghru becomes visible - the main pass through the Cairngorm plateau. indeed, a U-shaped valley.

IMG_1008s

After the path runs out, I follow the deer track across the sandy shore of the Geusachan Burn. The plan is simply to contour round and come in on the bothy. It's a hard life.

IMG_1009s

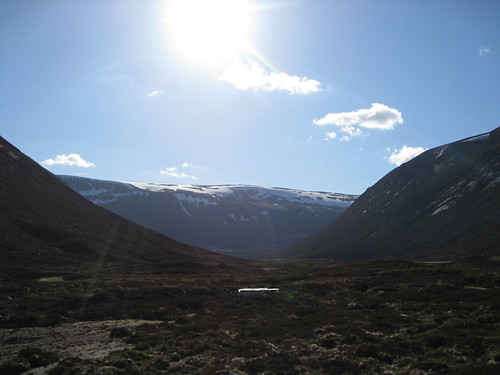
As it is now 6pm - had I been walking that long? - the sun starts to lower in the sky, allowing cracking views of the snow-lined side of Monadh Mór.

IMG_1012s

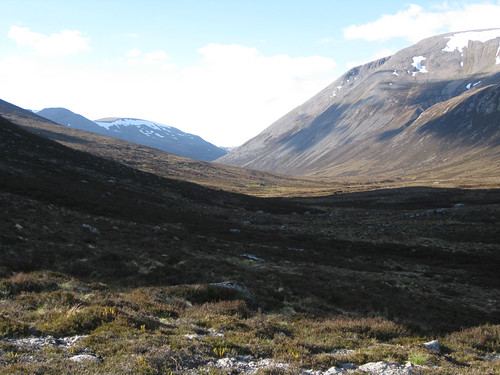
South back down Glen Dee - I walked up there. Approximate distances - Linn of Dee to White Bridge = 4.5km, White Bridge to Corrour = 9.5km. (tune in my head)

IMG_1014s

The bothy eventually becomes visible. (tune in my head)

IMG_1017s

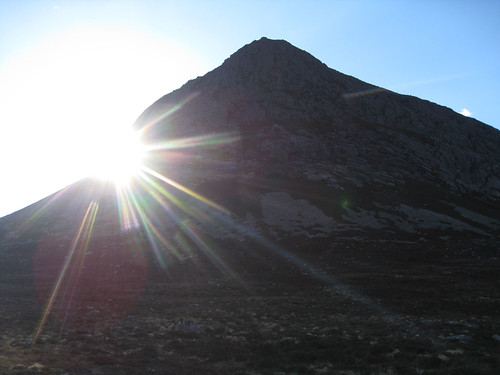
As the sun starts to move behind the Bod of the Devil, was it worth the walk? In this weather, yes.

IMG_1025s

A chin-wag with George and Keith. They've been here a while (the path on the east of the valley allowed them to get to the bothy quicker than my saunter).

IMG_1033s

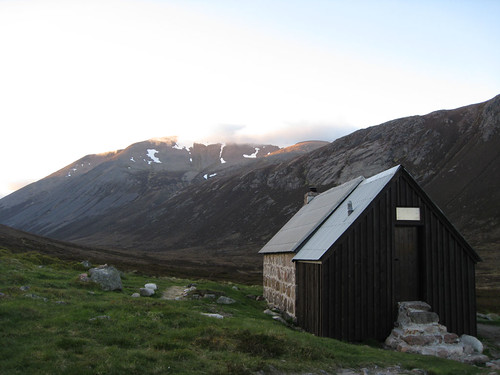
The bothy with its new toilet block - use it or lose it.

IMG_1032s

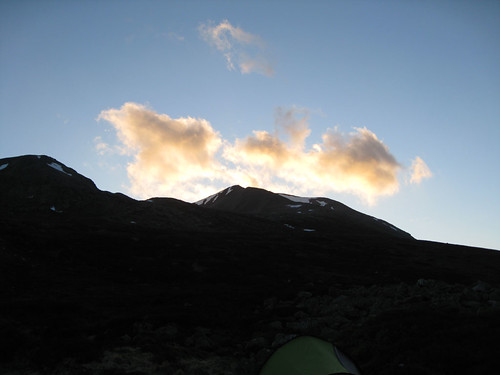
Dying sunlight picks out tomorrow's target - Carn a' Mhaim.

IMG_1035s

The mug and bowl is great (having arrived earlier that day). The cozy is 20cm wide x 24cm high. It fits a Wayfarer pouch perfectly. The cup kept the tea warm for between 15 and 30 minutes. The bowl holds 16 fluid ounces, and can fill most of the 18fl oz Aquagear filter bottle. Both are gradated with metric and imperial scales.

IMG_1027.sjpg

A group of phase-shifting red deer prance around the bothy.

IMG_1030s

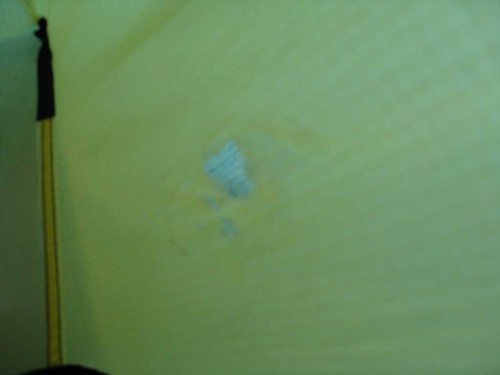
And I discover an 'ole in the inner of my Akto. Jings.
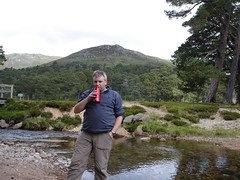
Wednesday, 12 December 2007

Peewiglet's Final C2C

If we all send out happy thoughts (difficult in these days of the capitalistic/faux-Christian Winter festival), but stay focused on one thought: please, Peewiglet, finish posting your final Coast-to-Coast diary. 190 miles from Irish sea to North sea. Across England. She walked it for the 3½th-time earlier this year.

Previous PW post.

Oh, and congratulations, Shirl. You are, as ever, an inspiration.

Sunday, 21 October 2007

Sleep, Little iPod

I resurrected an old project: using the iPod to listen to podcasts instead of going to sleep listening to the radio. I used to listen to Radio 4 last thing at night, but these days the "comedy" isn't that funny, and then they have "today in Parliament" - so if I catch that instead it often gets my blood boiling and I'm suddenly awake, arguing with the radio. Oops, I just noticed that the BBC's link to "today in Parliament" hasn't been updated since 2004 - that says a lot.

With my current iPod accessory list, the options are either headphones or one of those short-range radio gadgets that allows me to play through a radio speaker. Not ideal as headphones are uncomfortable to wear in bed and the other system has to be switched off completely or the batteries die.

So, whilst in Tescos the other night/morning, I let my eyes fall on their range of external speakers. Most were unpleasing to the eye, others too expensive for this sort of thing. The Logic3 i-Station3 was neither. 6rms of slinky black docking station/speaker system for 25 notes. It could be set up to sync with a pc, and can run on batteries or can charge a unit through the mains connection. It even has little perspex speaker covers. Mainly, some thought has gone into the design. Manufacturer's link.

As to the 'sleep' function. I went looking for Apple software, but found that the iPod's clock already has a sleep function. Which has just kicked in, finishing the movie I was watching ("The Treasure of the Sierra Madre" recorded from TV years ago), and all it leaves is a blue light showing at the station's On/Off switch. Apple link.

Final stage is to add a shortcut to the Sleep Function to the Main Menu. Settings > Main Menu. Sadly only allows me to add the Clock to the Main Menu, and not the submenu item of Sleep Timer. iPod Manual PDF.

I can now drift off to sleep listening to podcasts instead of BBC Radio, and so their mundane regular shows lose another customer to the Internet and the world of OnDemand media. Not because I want to, but because the stuff that is being churned out at times that I am listening/watching is of variable quality. Unlike the Today show in the morning, which is great to wake up to.

Sunday, 7 October 2007

Randonner-Leger

When Claude mentioned this site, of course I thought of "leger and ligne troops, I have some in 15mm". No Napoleonic infantry are photographed, instead it's a lightweight hiking website. I like the "avant/apres" photograph. Reminiscent of this month's TGO article by Eddy Meechan.

On recollection, the term "leger" is very appropriate. Brush up on your French, and visit the site:

http://www.randonner-leger.org

By the way, is it mandatory that everyone starts with a 70 litre rucksack? I did as well!

Sunday, 9 September 2007

CamelBak Parts

I decided to have a look for a replacement tube and bite valve for my CamelBak 2litre reservoir. I've had it for three summers, used it on every trip. Although cleaned regularly, the tube is getting stained, and I'm forever fishing out trapped gunk from the bite valve. So, time for a replacement.

Looking online, as I don't feel up to a walk up town (especially as I was going to spend today catching up with some of the work I'd missed), I see that it may be cheaper to buy a new system. In a similar vein to Darren's disposable printers, I notice that a new tube is £17.99 and a bite valve is £4.99 (source). A new 2 litre reservoir is £15.49 (source).

Of course, I'm not comparing like with like. The parts are for their military systems, and so are probable made of tougher material. A squaddy needs to know that a bite valve will work 100% of the time in the field, and will be using there's more often than us civvy hikers.

I did laugh to see that you could now buy the "HydroLink Tactical Pump" which will "refills reservoirs with ease. Operators no longer need to stop, remove their packs and access the reservoir pouch to fill back up." (link) Me? I use a plastic bottle with a special lid. Cost - well, free if you have the drinks bottle already. (link)

As to the original reason for looking, well, I'll have a wander into town during the week and look at a couple of shops that I know stock CamelBak spares. Worst-case scenario, twenty notes on a new hydration system.

Wednesday, 4 July 2007

Hydration Sack Refilling

I worked out this on the Southern Upland Way. Simple idea.

Take mouthpiece off carefully, insert tube into bottle, lift up bottle and squeeze bottle to start water flowing into the sack. Simple hydraulics. The bottle must be higher than the hydration sack for this to work.

With little practice, you can cut down the amount of air entering the hydration sack. You'll end up with some air in the hydration sack, but not enough to cause problems if you bleed the sack at the end of the day.

I've not seen anyone else talk about this or haven't read anyone else doing this, so it might be a world exclusive - but I doubt it. If I've thought of it, someone else must have.

Oh, and just carry the holed bottle lid in a pocket, and have a normal bottle lid to use when you want the bottle to hold water too. Extra weight: one plastic bottle lid with a hole in it (go figure).

Monday, 11 June 2007

Solo Tick Checking

I'd thought of this technique before, but tried it for real at the weekend, and it seemed to work. Instead of contorting yourself trying to angle a mirror to those difficult to reach places trying to see if it is a mole or a tick or your imagination playing tricks, use your digital camera. Just take a steady picture of the area. You'll probably need the macro switched on. That way you can also zoom in to see more details. Not much help when you have to remove any ticks found though; oh, and delete the photos to free space on you card and for sake of public decency too.
DSC03516L

Wednesday, 9 May 2007

AAR Glas Bheinn Mhor

I can't really call it Ben Starav, as we didn't get to Ben Starav.

Lessons learnt:

  • water - only take what is needed. If walking by a river, why fill a hydration sack that you won't empty.
  • kit - if I only used spare clothes, sandals and bivvy bag a few times on the SUW, why take it on a weekend hike.
  • writing down the weather forecast when listening to it on the radio is a good idea if being asked questions about it by others ... and your memory is as bad as mine. PS: an AM/FM radio is a great idea, with headphones so as not to annoy others. PPS: the 'regular' weather forecasts on the radio are woefully inadequate and detail is random. Regions of Scotland were often omitted.

Tasks before next time:

  • rationalise first aid kit. This is mainly blister repair kit (by the number of days out) and 'real' first aid, i.e. plasters, tablets etc.
  • sauces separate from the pasta. The pasta was filling (I used the pot cosy to keep it toasty) but the sauce just clung to the spaghetti.
  • small version of the Suunto instructions so I can set the various instruments on the move.
  • 'Explorer' scale maps for hills which have tricky bits. I've been using the Landranger series if a Harveys map is not available.
  • small pen for writing with, rather than the 'normal' pen I have. Of course, I'll have to wrap duct tape around it too.
  • when new poles arrive, I'll need to check the diameter against the 'pole fixing kit' that Hilleberg included with my Akto ("ooh, is that what that bit is?")
  • I started to decant the "lotions and potions" into smaller containers, and picked up one of Boots' "stacking travel pots" for around two pounds. About 35mm diameter, 5 pots high (each about 17mm high when closed), the plastic seems quite tough, and non-drip. Although I wouldn't trust it with liquids, I'm planning on adding some of the foot creams to them. More details later.
  • Bought an Exped Crush Drybag today from Nevisport. I recently discovered a cracked screen on my mp3 player. I don't want that to happen again, so a padded drybag is a nice and simple idea.

Suggestions:

  • Maps should have accurate Gaelic pronunciations on them [1]. This will, of course, take into account regional pronunciation differences (eg between Skye and everywhere else).
  • If running a place frequented by outdoors folk, eg bar or hostel, it would be a nice treat to pin a copy of the recent regional MWIS forecast somewhere.

Saturday, 14 April 2007

Transition Extreme

I hear on Radio Scotland's "out of doors" that Transition Extreme in Aberdeen opens today. I think I recognise the voice of the climbing instructor - sounds like the guy who sold me my boots and helped kit me out for the winter skills course. Must get some climbing/scrambling practice to get over my fears.

Saturday, 7 October 2006

Couch 2: Hike Wales

Chris Cowell's got a good looking blog across at Hike Wales. Just makes me realise that I must tweak the template here. My couscous recipe is blander than Chris' so I haven't posted it yet:

Boil water, use some to make brew, pour some into bag of flavoured couscous, close bag, put bag into the pan of hot water and leave until you finish cuppa. Stir and eat couscous.

Many of my 'recipes' are boil-in-bag, or eat out of bag. Shame the pizza delivery service uses mopeds and not mountain bikes. When I get more organised, I'll do things like Chris has, and follow up the real recipes in Freezer Bag Cooking. The author, Sarah Svien, was interviewed by Practical Backpacking in their third podcast. I heard it at Geldie Lodge earlier in the year and it piqued my fancy.

Monday, 2 October 2006

Tips 7: Taking down your Tent and Packing it

Freshly arrived tent
Start by sweeping out all dirt from the inner tent. Close all zippers.

Pull up all ground pegs except the ones at the end facing the wind.

Push out the pole from behind! Do not attempt to pull out the pole because the sections will separate from each other making it difficult to get it out!

When the pole has been taken out pull up the possibly remaining pegs, fold and roll up the tent around the pole and peg bags.

Make sure that while rolling the tent, air is gently escaping from it. You can also simply stuff the tent into its bag and pack away the pole and pegs bags by themselves.

To reduce condensation if the outer tent is wet on the inside detach the inner from it before taking down the tent. Otherwise inner and outer should remain linked and everything can be packed together.

Pole and pegs should not be packed right on the inside of the stuffbag but rolled up inside the tent before it is being placed into its bag. Otherwise you risk damaging the stuff bag.

[source: Hilleberg Akto pitching instructions - 2.42mb file >> download pdf version.]

The tent pegs and pole goes into their respective bags, and then the peg bag fits into the pole bag. That gets stored in the backpack separately from the fabric.

I haven't used a stuff sack for the fabric, other than the one that Hilleberg provided. I've been told a Granite Gear Stuffsack size 4 is suffice. I'll give it a try later. I find that the standard sack is okay for putting it into the base of the rucksack, or pressing the fabric flat and storing it against the back of the rucksack. If you have a large side pocket, you might find that you can store the fabric in there.

I've never yet had to detach the outer from the inner.

Sunday, 1 October 2006

Tips 6: Occupying your Tent


You should now be left with one pitched tent, your hiking gear and three bags supplied with the tent. Wrap the elastic band for the pole around the bag, stow that safely - I'll use the band to hold the peg bag, and stow that inside the tent fabric bag. These get stored at the 'head' of the tent's inner.

I quickly found that items got stored in regular places, and a routine was formed. Walking poles get dropped into the foot end of the porch. Rucksack was put into porch and door dropped if it was raining. Unpack rucksack:
  • Porch: hydration sack and cooking gear.
  • Doorway: sandals, toilet pack, handwash, trekking shoes (when undressed).
  • Foot of inner: empty rucksack, map case, softshell jacket (for under sleeping bag), food bag.
  • Body of inner: sleeping mat (short Therm-a-rest), sleeping bag.
  • Head of inner: gps, solar radio, book, mp3 player, head torch, first aid kit, water bottle, ointments bag, valuables bag, clothing bag, waterproofs.
Head torch sometimes hangs from ceiling tab, or stored in stowage pocket by tent door. Most of my gear is in waterproof bags and I'll use clothing bags inside a fleece as a pillow. Inside some bags are ziplock bags so I can keep gear together (eg solar-powered radio, earphones and spare batteries). I'll put them into my upturned wide-brimmed hat, so I can keep everything together.

Having been over-nighted in the tent by midges, I now keep a waterbottle inside the inner in case it happens again.

Get a brew on and relax.

Friday, 29 September 2006

Tips 5: Pitching your Tent (Ventilation)

The facts about condensation
Condensation is the exact opposite of evaporation. Air inside an occupied tent is warm and humid – which means it has lots of “evaporated” water molecules zipping around in it. That warmer, moister air rises and hits the tent wall (which is cooler because of conductive cooling), and those water vapor molecules slow down and “stick” to the cooler surface: they “condense” out of the air and onto the tent wall. The same thing can happen between your sleeping pad and the floor of the tent.

Hilleberg tents combat this process with:

  • Vents situated high up to let warm, moist air out.
  • Double wall design with water repellent, breathable inner tent fabric to let vapor pass through, and to keep actual water out.
  • More venting via mesh panels in the inner tent doors.


Ventilation
brow vent
One of the vents is an integral part of the entrance of the outer tent. The degree of venting can easily be adjusted by the size of the opening.

Zipper adjustable vents in head and foot ends of the outer tent provide good air flow, and are protected from rain by the angled design of the end itself.
inner
Also the inner tent has a large vent with no-see-um netting at the entrance which should be kept open whenever possible.

[sources: Hilleberg Akto pitching instructions - 2.42mb file >> download pdf version. Hilleberg Tent Manual - 6.09mb file >> download pdf version]

I tend to use all the vents, only closing one of the outer vents (the one that's into the wind) if the wind and rain are strong.

Unless really cold, I'll keep the 'no-see-um' mesh open. It's midge-proof too. In fact, the only place midges go into the inner was where the 2 zips meet, and that was able to be sealed using microporous tape from the first aid kit.

Thursday, 28 September 2006

Tips 4: Pitching your Tent (Guy Lines)

The tent comes with tied-on guy lines which should always be applied, even when the weather is fine.

When the ground pegs at the corners are in place one should pull out the guy lines and peg these to the ground. An angle of approximately 45° to the ends of the tent is appropriate.

The guy lines have two line runners each and are therefore easy to adjust even when they are immobilized at the pegs or other fasteners. It is imperative to pull the lines as far as possible from the tent for best results in strong wind. They should however not be pulled so tight that they they distort the natural shape of the tent.

In strong and gusty wind one can use another set of guy lines and angle them differently from the tent for more stability in shifting wind directions!

[source: Hilleberg Akto pitching instructions - 2.42mb file >> download pdf version]

When using the guylines, remember to untangle them from the tent first. It's stating the bleeding obvious, but, unlike many other tents, the guylines are fixed to the fabric in two places, so it's easy for one length to end up caught under the tent.

The guylines are great, and the 'line runners' [see picture below] are a nifty idea, allowing the guys to be located and tightened where the pegs can be secured. Useful in circumstances where the options for pegging are limited.


There are guy lines on the pole sleeve, which I always peg out. Some people don't. I do.

I just don't trust the weather, and the pegging only takes a few extra seconds. Ask yourself, "do you feel lucky?"

Wednesday, 27 September 2006

Tips 3: Pitching your Tent (Inserting Pole)

Insert the pole into the pole sleeve until you feel a slight resistance (about 100 cm / 40 inches into the sleeve).

Then pull the sleeve over the pole until it bottoms at the reinforced end of the sleeve.

Make sure that the pole does not bend before it gets to the reinforced end.

Take the tent by the pole tensioner (f.ex. peg loop) and insert the pole fully into the sleeve so that it bends naturally!

The pole sleeve has only one opening. In strong wind you can kneel on the tent to keep it on the ground.

Place the end of the pole into the plastic cup of the pole tensioner.

Pull it taut with the webbing until the pole is right against the side of the tent.

Pole tensioner and pole sleeve allow for double poling, enhancing stability and strength for the most demanding undertakings!

[source: Hilleberg Akto pitching instructions - 2.42mb file >> download pdf version]

Just a couple of things to watch out for here:

1. Make sure that the pole hasn't got caught on the far end of the sleeve.
2. I usually have to release the webbing strap a wee bit more to loosen the pole cup before inserting the pole, then pull it taut.


Tuesday, 26 September 2006

Tips 2: Pitching your Tent (Ground Pegs)

It is good to start by securing one end of the tent against the wind. Make sure that all sections are assembled properly.

Place ground pegs at the corners of the tent (start on the end towards the wind). Pull the tent taut and place the ground pegs at the other end. All four pegs are put through the metal rings at the corners.

Ground pegs are to be placed at an angle of 45° into the ground for good grip.

[source: Hilleberg Akto pitching instructions - 2.42mb file >> download pdf version]


Storing the fabric separate from the poles and pegs saves space in your pack. Also, if you fold/roll the fabric towards the head end in the morning, you can unroll the tent holding on to the 'head' end at night. Makes it easier to place the tent properly for the all-important view.

Making sure that none of the guylines are tangled, peg out the 'head' end with 2 pegs, and then move to the 'foot' end. As you go, untangle any guylines or the central webbing that runs under tent, and then peg out the 'foot' end of the tent. If it's windy or gusting, keep the fabric low and secure as you're moving to complete the pegging out. Relying on 2 pegs to hold down a potential kite is not a sensible option, even if the profile is low at this stage.

For me, the head of the tent is the end with the porch in it. Some people prefer looking diagonally out of the porch. I've slept that way a couple of times when the tent is on a slope and the wind direction has limited the tent's pitching options. You lose the option of having handy gear in the pouch, but that's all.

At the moment I'm storing the tent in the Hilleberg bag, but will be investigating stuff sacks later.

Monday, 25 September 2006

Tips 1: Choice of site

campsite at Lochan Odhar

Choice of site

Find a site that is even and without any sharp objects. Remove those things that can damage your tent. Find a spot that is protected from the wind. Avoid pitching your tent close to any bodies of water to minimize condensation. Avoid also hollows where rain water can gather.
[source: Hilleberg Akto pitching instructions - 2.42mb file >> download pdf version]

One of the advantages with the Akto is that it doesn't need much clear space to pitch it in.

Once I've found an area, eg here at Lochan Odhar to the north of the Braeriach, I drop my rucksack and wander around with my walking poles to find a suitable site. I also want a good view from the door, which is normally over my left shoulder as I'm lying down, with my feet into the wind.

Walking over the ground, I can use the poles to prod the ground, also to measure out approximate areas (2 poles long, 1 pole wide) if there's any doubt. Finally, I can lock the poles together with loops and leave them in the ground to mark where I've decided to camp while I go back and get my rucksack.

All plans have failings, and finding a hidden projection beneath the tent can mean you have to move. I've done that, and it's better than chancing a torn groundsheet. At the moment, I'm not using a 'footprint'. That might change in the future, but I've never used one in my limited time under canvas.