I deleted the introduction. I need no rationale. I blame reading “Charley’s War” when I was a kid. The more I read, the more I want to do it right. Painting the right uniforms. Adding the right mud. My skills are limited but I can try. Taking my time. Reading more books. Looking at more photographs. Taking my time. It won’t be ready for Christmas.
Workflow:
- 600x300mm polystyrene sheets. Masking tape to protect the edges.
- Then applied ‘modroc’ (sheets of plaster-coated scrim). Shallow bomb-craters were made by rolling up the scrim into a tube, and then shaping it into a circle.
- Plaster was then applied (using “no more cracks” as it is pre-mixed and promises not to shrink).
- Watered-down PVA glue was applied to the surface, sprinkling on some ‘ballast’.
- I had settled on a standard base style for the figures, so will be building up the terrain boards, trenches, etc to match. I used Daler-Brown 223 Burnt Umber, mixed with water in a plastic tub.
- There is still much dry-brushing and maybe even getting some more realistic-looking craters. The markers are “Eldritch Gems” that seemed to work on Tuesday, so I ordered some for myself.
Each stage taking about 3 hours to dry. Having completely under-estimated the task, so I ran out of various supplies last weekend. I expanded the trenches that I had made before, deciding on 3 lengths per side. If each were separated by 3 terrain boards (3 x 300mm), then I’d need 9 boards, not the 4 originally intended. More modroc, more paint, more plaster, more PVA.
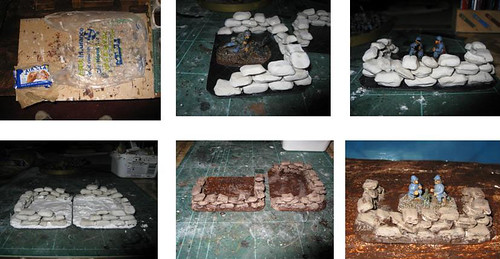
Since I was in the creative frame of mind, I dug out the pack of Humbrol “Air Clay” I had bought a couple of Decembers back. This was what I bought it for. I tried various techniques, but settled on one where I roll the clay into a tube, flatten it into a rectangular section, and then cut it into the right size with a Stanley knife. The knife naturally ‘nips’ the clay, so minimal footering is required.
- Once on the crumpled carrier bag, the air can circulate under the clay, drying more evenly.
- I decided on plastic-card for a base, scoring it to provide a purchase.
- I used some of the models to give me an idea of what size the emplacement would be. The bags are then glued in place with PVA glue. Allowing one layer to dry before moving to the next one.
- I then textured the inside and out with the same plaster, and then painted with water-down PVA to seal the materials, and strengthen the walls.
- The whole model was then painted in the same brown as the terrain boards, before dry-brushing with a different shade of brown (Citadel Foundation Khemri Brown).
- I’ll paint in any ‘holidays’ when I notice them.
It may not look as good as one made by an expert, but the clay cost me a fiver, and the plasti-card about two quid for an A4 sheet. It doesn’t take much filler, nor paint.
 Getting on with my life and thinking about things.


2 comments:
Wow!! a bit of work in that lot, you must have the patience of a saint.
Looks expert enough to me.
Just cleared the decks for the weekend, and had done the research beforehand. Screwed up on the materials though.
All simple stuff. Just a work-flow. I still need to get detail added. Which will test my patience.
I forgot to list - "clean up mess after each stage" ... I still have a 'blood trail' of plaster dabs to remove from the carpet.
Post a Comment